Drypoint is the most direct printmaking method because the artist’s hand physically plows metal, creating a fragile burr that is both the source of its beauty and its fatal flaw.
- The signature velvety line comes from ink trapped in this raised metal ridge, not the incised line itself.
- This burr quickly degrades under press pressure, severely limiting editions, often to fewer than 25 prints from a copper plate.
Recommendation: Master the wiping technique; it is not cleaning, but a sculptural act that defines the print’s final atmosphere and tone.
For any draftsperson, the connection between hand, tool, and paper is sacred. The weight of a graphite line, the sweep of a charcoal gesture—it’s an immediate translation of intent to surface. But how do you replicate that raw energy in a print? Many intaglio processes, like etching, involve acids and chemical resists, creating a disconnect between your mark and the final plate. They feel indirect, mediated. This is where drypoint enters, not as a technique, but as a philosophy. It’s the most direct and brutally honest form of intaglio because there is nothing between your hand and the metal.
Unlike other methods, drypoint requires no chemistry, no grounds, no mordants. It is simply the act of using a sharp needle to scratch, gouge, and plow lines directly into a plate. This physical act creates a metallic scar. But the true magic, and the inherent tragedy of the medium, lies in the displaced metal that forms a ridge alongside the incised line. This is the « burr, » a fragile, microscopic mountain range that gives drypoint its soul. The process is a constant negotiation between creation and destruction, where the force of your hand directly dictates the life and death of the image.
This guide explores the physical consequences of that directness. We will dissect the material choices, the mechanics of the velvety line, the reasons for its heartbreakingly short life, and the methods artists use to control—or embrace—its inevitable decay. You will learn not just what drypoint is, but why its directness makes it a powerful and expressive medium for any artist trained in the art of drawing.
To fully grasp this technique, we will explore the key decisions and consequences an artist faces, from the initial choice of plate to the final numbering of the edition. This table of contents outlines the journey.
Summary: The Physical Consequences of Direct Printmaking
- Plastic or Copper: Which Plate Material Holds the Burr Longer?
- Velvety Lines: How Does the Raised Metal Catch the Ink?
- Why Can You Only Print 20 Copies of a Drypoint?
- The Mistake of Cleaning the Plate Too Well: Leaving Tone
- Electroplating: How to Extend the Life of a Copper Drypoint?
- Accuracy vs Distortion: When Should You Break the Rules of Anatomy?
- Strike Through: Why Must You Cancel the Plate after Printing?
- Artist Proof vs Limited Edition: What Are the Rules of Numbering Prints?
Plastic or Copper: Which Plate Material Holds the Burr Longer?
The first decision you make in drypoint directly impacts the lifespan of your image. The choice of plate material is not about preference; it’s a strategic calculation of durability versus cost and accessibility. The two most common options, plastic (like plexiglass or PETG) and copper, sit at opposite ends of this spectrum. A plastic plate is inviting for its low cost and the ease with which a needle glides across its surface. It’s a fantastic entry point for experimentation, allowing you to translate drawing gestures with minimal resistance.
However, this softness is also its greatest weakness. The burr raised on a plastic plate is extremely delicate. Under the immense pressure of a printing press, this fragile ridge of plastic flattens and wears away almost immediately. As a result, professional printmakers find that plastic plates are unsuitable for creating a consistent edition. In fact, research on plastic plate materials reveals you can expect to pull approximately 10 impressions maximum before the signature velvety line quality completely disappears, leaving only a faint, ghost of the original mark.
Copper, on the other hand, is the traditional and professional standard for a reason. It is a harder metal that offers more resistance to the needle, forcing you to commit to each mark with intention. This resistance produces a stronger, more resilient burr. While more expensive, copper plates are significantly more durable. A comprehensive study demonstrated that a well-worked copper plate can yield approximately 25 quality prints before the burr degradation becomes too severe. This makes copper the only viable choice for artists planning a limited edition, as it holds the physical « DNA » of the burr for a longer, more predictable run. The material itself dictates the potential of the art.
Velvety Lines: How Does the Raised Metal Catch the Ink?
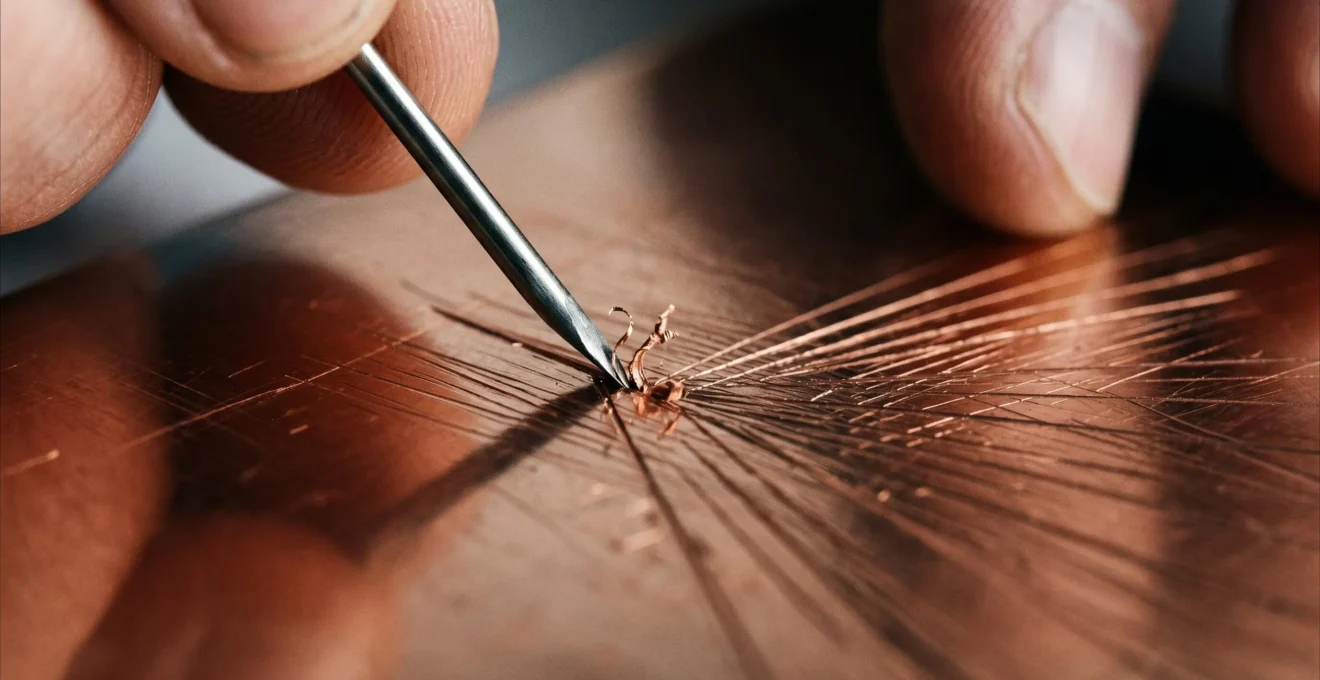
The defining characteristic of a drypoint print—the one that sets it apart from the clean, sharp lines of engraving or etching—is its soft, velvety, and almost atmospheric line quality. This effect is a direct result of the medium’s unique physics, and it has everything to do with the burr. When you incise a line, the needle doesn’t just create a V-shaped groove; it plows through the metal, displacing it and piling it up on one or both sides of the channel. This ragged, raised ridge is the burr.
This is where the magic happens. When you apply ink to the plate, it fills both the incised line and, crucially, clings to the rough, textured surface of the burr. As Wikipedia contributors note in their analysis of the technique, « A larger burr, formed by a steep angle of the tool, will hold a lot of ink, producing a characteristically soft, dense line. » The ink held by the burr prints as a soft, slightly fuzzy edge that bleeds out from the main line, creating that signature rich, velvety texture. The incised line itself prints a much sharper, cleaner mark; the burr is what provides the soul and atmosphere.
The image below provides a macro view of this mechanism, showing how the jagged, torn metal of the burr acts as a physical trap for ink particles.
As you can see, the burr is not a neat, uniform structure. It’s a chaotic landscape of torn metal. This is why the angle of your tool is so critical. A needle held more vertically creates a smaller, more controlled burr on both sides of the line, while a more aggressive, angled attack throws up a much larger, more dramatic burr on one side. This gives you, the draftsperson, direct control over the texture and weight of every single mark on the plate. You are not just drawing a line; you are sculpting a structure designed to hold ink.
Why Can You Only Print 20 Copies of a Drypoint?
The same physical feature that gives drypoint its beautiful, velvety line—the burr—is also the cause of its greatest limitation: a severely restricted edition size. The burr is a fragile, microscopic ridge of metal. Every time the plate is run through a printing press, it is subjected to several tons of pressure. This immense force, necessary to transfer the ink from the plate to the paper, simultaneously crushes and flattens the delicate burr. Each print you pull effectively wears down the plate.
This process of degradation is swift and irreversible. The first few prints of an edition will be rich, dark, and fuzzy, displaying the full effect of the ink held by the fresh burr. As the edition progresses, the burr is systematically worn away, holding less and less ink with each pass. The lines become sharper, thinner, and lighter. Eventually, the burr disappears completely, leaving only the shallow, incised line, which itself quickly wears out. As a result, the number of high-quality impressions you can pull from a single drypoint plate is extremely small. According to printmaking education resources, a standard edition will typically range from 20 to 50 prints, but that upper number is optimistic.
In practice, many artists find the number is even smaller. For a pure drypoint on an un-faced copper plate, it’s common to get only 10 to 20 impressions where the burr is still prominent. This physical reality creates a tension for the artist. Contemporary artist Pat Matthews, for example, documents producing drypoint etchings with a planned limited edition of 100, while acknowledging that « the copper plate will only last so long. » This illustrates the practical conflict between the desire for a larger, more accessible edition and the hard physical limits of the medium. The value of a drypoint print is intrinsically tied to its scarcity, a scarcity dictated by the physics of metal fatigue.
The Mistake of Cleaning the Plate Too Well: Leaving Tone
For a draftsperson accustomed to the stark contrast of white paper and a dark line, the concept of inking a drypoint plate can be counter-intuitive. The goal is often not to wipe the plate perfectly clean, leaving ink only in the lines. Instead, the wiping process is a creative, subtractive act—more akin to sculpting light and shadow than to cleaning. Leaving a deliberate, controlled film of ink on the surface of the plate, known as « plate tone, » is a key technique for creating atmosphere, depth, and mood in a print.
Wiping too aggressively or too thoroughly is a common mistake that strips the print of its potential nuance. A perfectly clean plate can look sterile and harsh. A subtle layer of tone can suggest a hazy sky, a dark room, or a misty landscape. The direction and method of your wipe are also critical. As printmaking historian André Béguin noted, « The ink often clings to the plate in different ways depending on the direction in which the plate is wiped. » Wiping against the grain of your lines can pull ink out of the burr, while wiping with the grain helps to preserve it. Your hand, wrapped in tarlatan or simply using your palm, becomes a secondary drawing tool.
Achieving a beautiful, consistent plate tone requires a systematic approach. It’s a delicate balance between removing excess ink and leaving just enough to create the desired effect. The following checklist outlines a professional sequence for wiping a drypoint plate to achieve both crisp lines and rich atmospheric tone.
Action Plan: Mastering the Drypoint Wipe
- Ink Application: Use a dauber or small card to apply ink to the entire plate surface. Be firm but gentle, ensuring ink is pushed into all incised lines and fully covers the burr.
- Initial Removal: Gently use a plastic scraper or card to remove the bulk of the excess ink from the surface. Avoid applying heavy pressure that could flatten the fragile burr.
- Tarlatan Wiping: Ball up a piece of tarlatan cloth into a firm sphere. Use light, circular motions to begin lifting the ink film from the plate. This stage refines the overall tone.
- Directional Hand-Wiping: Finish the wipe with newsprint or the heel of your palm. This is the most sensitive step. Wipe in the direction of important lines to avoid pulling ink from the burr. Use this to create highlights and control the final tonal areas.
- Controlled Tone Retention: Assess the plate. Instead of aiming for a perfectly polished surface, intentionally leave a thin, even veil of ink to create atmospheric effects. The plate is now ready for the press.
Electroplating: How to Extend the Life of a Copper Drypoint?
Given the tragically short life of a drypoint burr, what can an artist do when they need to produce a larger, more consistent edition? The answer lies in a commercial industrial process adapted for printmaking: steel-facing, or electroplating. This technique provides a way to armor the delicate copper plate, dramatically extending its printing life. Steel-facing involves submerging the finished copper plate in an electrolytic bath, where a microscopic layer of steel is chemically bonded to its surface. This steel coating is exceptionally hard and durable, protecting the soft copper and its fragile burr from the crushing pressure of the press.
The results are dramatic. While an unfaced copper plate might yield only 10-20 good impressions, a steel-faced plate can produce a much larger edition with remarkable consistency. In fact, technical printmaking resources demonstrate that a faced plate can yield 50 or more prints, and sometimes hundreds, before any significant degradation occurs. The steel layer is so thin that it perfectly replicates every minute detail of the burr, preserving the rich, velvety line quality that would otherwise quickly vanish. It effectively « freezes » the plate at its moment of peak quality.
However, this durability comes at a significant cost, making it a serious financial and artistic decision. It is not a casual step but a professional service reserved for plates destined for significant editions.
Case Study: The Real-World Cost of Steel-Facing
The pricing structure at professional shops like Highpoint Center for Printmaking reveals the practical investment required. The service involves a setup fee (e.g., $85) plus a per-plate cost based on size (e.g., $112.50 or $0.55 per square inch). Critically, the plate must be delivered in an immaculately clean condition, as any tarnish or residual ink will prevent the steel from bonding properly, incurring additional cleaning fees (e.g., $35/hour). This cost structure means steel-facing is typically reserved for commercially viable editions, not for spontaneous artistic experiments. It is the ultimate tool for preserving a mark, but one that requires a deep commitment.
Accuracy vs Distortion: When Should You Break the Rules of Anatomy?
For an artist skilled in drawing, the drypoint needle feels incredibly natural. As printmaking resources often point out, the technique is « closer to using a pencil than the engraver’s burin. » This familiarity is both a comfort and a trap. It’s easy to fall into the habit of simply transcribing a pencil drawing onto a plate, focusing on anatomical accuracy and precise rendering. But to do so is to miss the true expressive potential of the medium. Drypoint doesn’t just invite distortion; it rewards it. The resistance of the metal, the way the needle can skip and gouge, the raw physicality of the mark—all of these elements encourage a departure from rigid accuracy.
Breaking the rules of anatomy becomes a strategic choice when the emotional truth of a gesture is more important than its literal representation. A hand can be enlarged to express weight or tension; a facial feature can be twisted to convey anguish; a landscape can be fractured to create a sense of unease. Because the process is so direct, every flicker of your wrist, every increase in pressure, every aggressive, slashing mark is permanently carved into the plate. This isn’t about making mistakes; it’s about channeling raw energy directly into the metal.
This image captures the intensity of that physical act, where the artist’s hand is not just rendering, but attacking the plate with expressive force.
The moment to break the rules is when your goal shifts from depicting reality to conveying a feeling. Drypoint is the perfect medium for this because the physical struggle with the material becomes part of the image itself. The jagged burr from a furious scratch carries more emotional weight than a thousand perfectly rendered lines. In this context, « distortion » is not an error; it is a more profound form of accuracy, one that is true to the emotion rather than the form. It’s about embracing the brutal directness of the tool to say something that a pencil cannot.
Key Takeaways
- The burr, a raised metal ridge, is what creates the signature velvety line, not the incised groove itself.
- Plate material is a critical choice: soft plastics yield few prints, while harder copper allows for small editions.
- The wiping process is a creative act of controlling « plate tone » for atmosphere, not just a cleaning step.
Strike Through: Why Must You Cancel the Plate after Printing?
Once the final print of a limited edition has been pulled, the artist’s work is not yet finished. A crucial, final step is required to guarantee the integrity of the edition and protect the value of the work for collectors: the cancellation of the plate. To cancel a plate means to permanently deface it, ensuring that no further impressions can ever be made. This act is the ultimate guarantee to a buyer that the edition size stated is, in fact, the absolute final number of prints that will ever exist from that image.
As the editors at Artsy explain, « Printers and artists often destroy the materials that they use to create these works… to make sure that it is impossible to add to the edition later on. » This act of controlled destruction is a cornerstone of ethical printmaking. The most common method is to score or scratch large « X » marks across the face of the plate with a sharp tool, gouging deep into the primary image. These new marks permanently mar the matrix, making it impossible to pull a clean, unaltered impression again.
To document this act, artists often pull one final print from the defaced plate. This is known as a cancellation proof or « l’épreuve rayée. » This final, marred impression serves as tangible evidence that the plate has been destroyed. Contemporary printmaking studios, like that of Josh Agle, formalize this by defining a cancellation proof as « a single proof pulled from the defaced screen/plate/block to show that the edition was limited and no further prints can be made. » This single print becomes a vital piece of the edition’s history, a « death certificate » for the plate that authenticates the scarcity and value of the prints sold to the public. It is the final, irreversible act in the life of the drypoint plate.
Artist Proof vs Limited Edition: What Are the Rules of Numbering Prints?
Once an edition is printed, the final step before it enters the market is signing and numbering. This seemingly simple act is governed by a strict set of conventions that communicate a print’s status and value to collectors. The primary component of an edition is the set of prints intended for sale, which are numbered as a fraction, such as « 15/100. » This indicates the 15th print in an edition of 100. However, alongside this main edition, artists also pull a small number of additional prints for their own use, known as Artist’s Proofs (A/P). Originally used for quality control, these are now highly sought-after by collectors.
The key rule is that Artist’s Proofs should be a small, finite number. According to art market standards, artist’s proofs should account for no more than 10% (or sometimes 15%) of the main edition size. Because they are rarer and have a closer association with the artist, A/Ps often command a higher price. Beyond the A/P, there are several other markings that denote a print’s specific role, each with its own place in the printmaking hierarchy. These different proofs can be confusing, but they follow a clear system.
The following table, based on an analysis of print market terminology, breaks down the most common types of proofs, their markings, and their status in the art world.
| Proof Type | Marking | Typical Quantity | Original Purpose |
|---|---|---|---|
| Limited Edition | e.g., 15/100 | Base edition size | Primary commercial release for collectors. |
| Artist’s Proof | A/P or E.A. | 10-15% of edition | Artist’s personal archive and quality testing. |
| Bon à Tirer (BAT) | BAT or RTP | Single proof | The master print the printer must match. |
| Printer’s Proof | P/P | 1-3 proofs | Compensation for the master printer. |
| Hors de Commerce | H/C | Very limited | Not for sale; for gallery/dealer display. |
Now that you understand the entire process, from the initial scratch to the final signature, it’s time to put it into practice. Stop thinking about perfection and start making marks. Grab a plate, feel the resistance of the metal, and discover the raw, direct expression that only drypoint can offer.
Frequently Asked Questions About Drypoint Printmaking
Are lower edition numbers more valuable than higher numbers?
No. This is a common myth. In modern practice, prints are rarely numbered in the order they were printed. They are dried on racks and signed later, often in a random order. A print numbered 1/100 has the same quality and market value as print 100/100. With drypoint, however, there can be a qualitative difference, with earlier pulls having a stronger burr, but this isn’t reflected in the number.
Where should edition numbers and signatures appear on a print?
Standard convention places the edition number on the bottom left corner, the title (if any) in the center, and the artist’s signature on the bottom right corner. All marks should be made in pencil (a sharp 2H is ideal) just below the plate impression. Using pencil instead of ink is a security measure to prevent fraudulent reproduction of the signature.
Can an artist sell their Artist’s Proofs, or must they keep them?
While traditionally Artist’s Proofs were kept by the artist, it is now common practice for artists to sell them. They are typically released after or alongside the main edition. Because they are rarer (only 10-15% of the edition size) and carry the prestigious A/P mark, they often command 20-50% higher prices than standard prints from the edition.
How should artists number a variable edition where each print is unique?
For a variable edition, where each print is intentionally different (e.g., printed on different paper, with unique hand-coloring, or varying ink), artists use the marking « E.V. » which stands for Edition Varied (e.g., E.V. 1/10). This signals to the collector that each piece is a unique variant within a limited series, not a uniform impression.