Transforming your clay sculpture into bronze is not just a technical process; it’s a series of critical artistic decisions that lock in its final form and value.
- The choice between silicone and plaster for the initial mold is the first crucial decision, determining whether you can create a single piece or an entire edition.
- The final cost is driven less by the raw metal and more by the hours of highly skilled labor for wax work, metal finishing, and patination.
Recommendation: Approach a foundry not with just a finished clay piece, but with a clear understanding of these key stages to budget effectively and preserve your artistic vision throughout the entire transformation.
The moment a sculptor puts down the tool, a finished clay form breathes in the studio air. It’s a moment of triumph mixed with profound vulnerability. The piece is complete, yet ephemeral, its life measured in days or weeks before it dries and crumbles. The ancient call to make it permanent, to translate its fragile beauty into the timeless strength of bronze, is a powerful one. Many guides will present the lost wax process as a simple, linear recipe: make a mold, pour the wax, pour the bronze. This view misses the soul of the process entirely.
The journey from clay to bronze is not a mechanical transaction. It is a dialogue between material and fire, a controlled collision of industrial science and artistic intuition. It is where your vision is subjected to incredible heat, pressure, and chemical transformation. To navigate this process successfully, you must understand it not as a service you buy, but as an extension of your own creative practice. Understanding the *why* behind each technical choice—from the type of silicone used in the mold to the specific chemistry of the patina—is the only way to control the magic and avoid costly, heartbreaking disasters.
This guide will walk you through the heart of the foundry, illuminating the critical decision points that are often hidden from view. We will explore how to capture every detail, why the work on the wax positive is so crucial, what really happens inside the crucible’s inferno, and how the final color is born from a kind of controlled alchemy. We will also pull back the curtain on the true costs, from a desktop piece to a monumental public work, empowering you to plan, budget, and execute your project with confidence.
Contents: Lost Wax Process: A Sculptor’s Comprehensive Guide
- Silicone or Plaster: How to Capture Every Detail of the Original?
- Imperfections and Seams: Why Is Retouching the Wax Critical?
- Bronze Temperature: What Happens Inside the Crucible?
- Chemicals and Heat: How to Color Bronze Green, Brown, or Black?
- The Error of Underestimating Foundry Costs for Your Sculpture
- Materials and Labor: How to Estimate Costs for a Monumental Work?
- How Much Does It Cost to Fix a Damaged Assemblage Piece?
- How to Propose and Execute a Public Installation Art Project in a UK City?
Silicone or Plaster: How to Capture Every Detail of the Original?
The first transformation is a paradox: to create a perfect copy, you must first encase your original. The choice of material for this initial mold is the first and perhaps most fundamental decision you’ll make, as it dictates the future of your sculpture. This is not a simple technical choice; it defines whether your work will be a unique piece or the first of an edition. The two primary paths are plaster and silicone, each with a distinct philosophy.
A plaster mold is the traditional, direct, and destructive route. It captures detail well but is rigid. To remove the wax positive cast inside it, the plaster mold must be chipped away, which is why it’s often called a « waste mold. » It is a one-shot process. This makes it suitable only for creating a single bronze cast. Its advantage lies in its lower material cost.
A silicone mold, by contrast, is an investment in reproduction. It is flexible, allowing it to be peeled away from complex shapes and undercuts without damage to either the mold or the cast. This flexibility means you can reuse the mold to create multiple wax positives, and therefore, an edition of bronze sculptures. This is known as a « production mold. » The silicone itself is supported by a rigid outer « mother mold, » typically made of plaster or fiberglass, which ensures the flexible silicone holds its precise shape during wax pouring. While more expensive upfront, its cost is amortized across an entire edition, making it the standard for professional artists. A key consideration is compatibility; some clays contain sulfur, which can inhibit the curing of platinum-cure silicones, so a small test is always necessary.
Ultimately, the choice reflects your intent. Are you creating a singular, unique object, or is this the genesis of a family of works? Your answer will guide you to the correct material dialogue from the very first step.
Imperfections and Seams: Why Is Retouching the Wax Critical?
After the mold is made, a new, temporary version of your sculpture is born: the wax positive. This hollow wax cast is the ghost of your final piece, a perfect replica in form but fragile and transient. It is here, in this intermediate stage, that some of the most critical artistic and engineering work takes place. The process is called « wax chasing, » and it is far more than simple cleanup; it is the artist’s last chance to touch the sculpture’s surface before it is forever sealed in metal.
The wax cast will inevitably have minor imperfections: tiny air bubbles, and seams where pieces of the mold met. These are meticulously scraped, filled, and blended using heated tools. But the real « engineered magic » begins with spruing. A complex network of wax rods, gates, and vents is attached to the wax positive. This tree-like structure looks like a bizarre addition, but it is the sculpture’s life support system for the bronze pour. The main channels (sprues) will guide the molten bronze, the smaller ones (gates) will direct it to every extremity, and the vents will allow hot gases to escape. A poorly engineered sprue system will result in an incomplete cast, trapped air bubbles, or even a catastrophic failure.
As this image shows, the spruing process is a sculptural act in itself. Each connection point must be perfectly blended. The artist and founder must think like flowing metal, anticipating pathways and potential blockages. This is the last moment of direct sculptural intervention. Every tool mark you leave or remove on this wax surface will be faithfully, and permanently, reproduced in the final bronze.
This is why retouching the wax is so critical: it is the final, silent conversation with the form before you hand it over to the violence of the fire. Any flaw you ignore here will be a permanent regret in bronze.
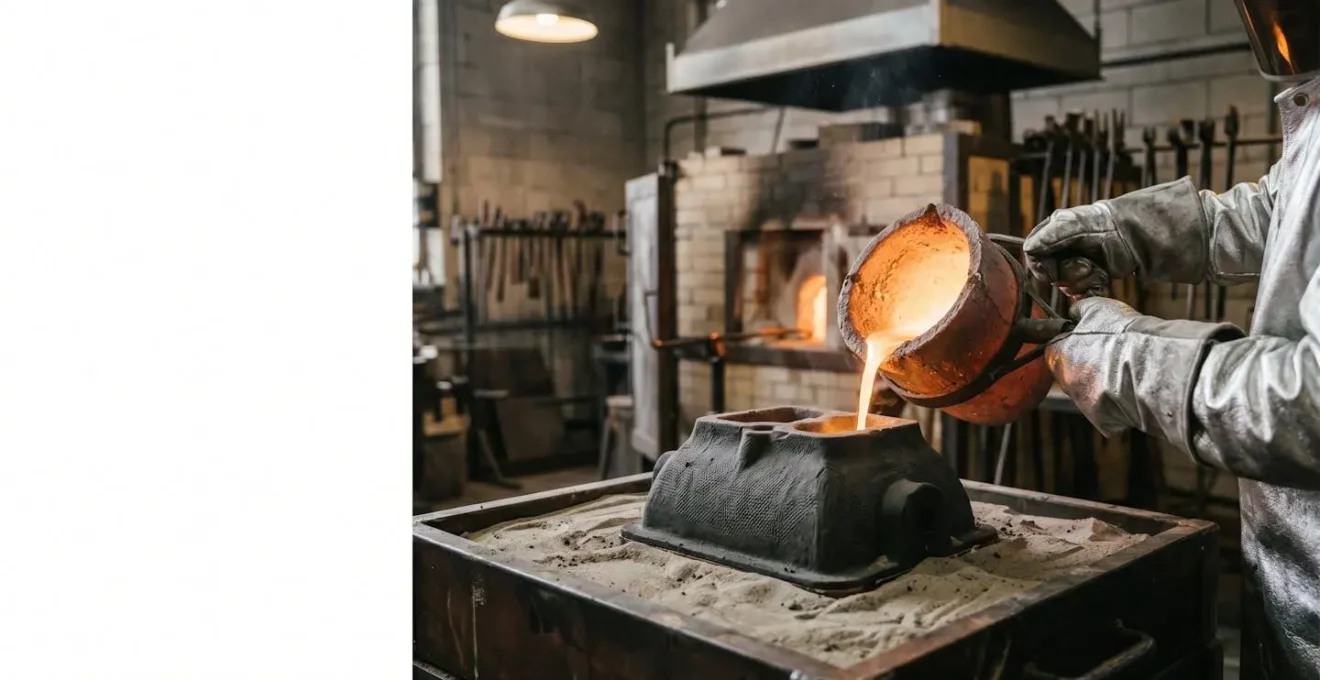
Bronze Temperature: What Happens Inside the Crucible?
The foundry’s heart is the furnace, and its lifeblood is held within the crucible. Here, the process transitions from cool, deliberate craftsmanship to the raw, untamable power of elemental change. Solid ingots of bronze alloy are lowered into a ceramic crucible, which is then heated until the metal surrenders its form and becomes a radiant, flowing liquid. This is not just melting; it is a moment of pure industrial magic, a spectacle of intense light and power.
The temperatures involved are extreme. While there are variations, a foundry’s furnace operates in a realm far beyond ordinary experience, with most bronze alloys melting within the range of 850°C to 1050°C (1562°F to 1922°F). At these temperatures, the metal glows with an almost solar intensity, shifting from a dull red to a brilliant yellow-white. The air shimmers with heat, and the sound is a deep, primal roar. Handling a crucible filled with liquid metal requires immense skill, protective gear, and a deep respect for the forces at play.
But « bronze » is not a single material. It is a family of copper-based alloys, and the specific recipe dictates its melting point, fluidity, and final color. An artist’s choice of alloy has both aesthetic and technical consequences, as different alloys require different pouring temperatures to achieve a successful cast. The following table breaks down some common sculptural alloys.
| Bronze Alloy Type | Liquidus Temperature | Optimal Pouring Temperature | Key Properties |
|---|---|---|---|
| Silicon Bronze | ~1000°C | 1050-1100°C | Excellent fluidity and detail capture |
| Tin Bronze (Traditional) | ~900°C | 950-1000°C | Classic alloy for sculpture, good flow |
| Aluminum Bronze | ~1080°C | 1130-1180°C | Higher strength, requires more superheat |
Understanding this stage reveals that the foundry isn’t just melting metal; they are practicing a precise form of metallurgy, carefully managing temperature to match the specific properties of the chosen alloy to ensure your vision flows into every last detail of the ceramic shell.
Chemicals and Heat: How to Color Bronze Green, Brown, or Black?
Once the raw bronze has been cast, welded, and chased to perfection, it exists in a state of naked, shimmering gold. While beautiful, this is rarely the final vision. The final act of the transformation is the patina—a process of coloring that is often misunderstood as painting. A patina is not a coating applied to the surface; it is the surface itself, chemically altered through a process of controlled alchemy.
The patina artist uses a combination of specific chemicals and intense heat to rapidly accelerate the natural oxidation process that bronze would undergo over decades or centuries. The bronze sculpture is heated with a torch until it’s hot to the touch. According to professional guides, most hot patinas require heating the bronze to 180-200°F. At this temperature, the pores of the metal are open and receptive. Then, a solution of specific chemicals is sprayed or brushed onto the hot surface, where it sizzles and reacts almost instantly, creating a layer of colored corrosion.
The final color is not a single, flat tone but a complex, layered finish that can be varied in tone and transparency. Different chemicals produce different colors, and a skilled patina artist often uses multiple layers of different solutions to achieve a deep, rich, and nuanced result. Their tool kit is less like a painter’s palette and more like an alchemist’s grimoire.
| Chemical | Color Range Produced | Application Method | Temperature |
|---|---|---|---|
| Ferric Nitrate | Warm golden brown to dark burgundy-brown | Spray or brush | Hot (180-200°F) |
| Cupric Nitrate | Blues and greens (turquoise to deep green) | Spray or brush | Hot (180-200°F) |
| Liver of Sulfur | Golden brown to burgundy-black | Spray or immersion | Hot or cold |
| Bismuth Nitrate | Off-white to pearly white | Brush application | Hot (180-200°F) |
After the desired color is achieved, the sculpture is allowed to cool, and then sealed with a layer of wax. This final wax coating protects the patina and gives the bronze its characteristic soft luster. It is the end of the transformation, where industrial process gives way to a finish that is purely, magically, artistic.
The Error of Underestimating Foundry Costs for Your Sculpture
One of the most common and painful shocks for a sculptor new to bronze is the final foundry bill. It’s easy to assume the cost is primarily driven by the weight of the metal itself, but this is a fundamental misunderstanding. The truth is that the raw material is often one of the smaller components of the total cost. The real cost drivers are time, skill, and consumables—the hours of expert labor and the specialized materials required at every stage.
To avoid this error, you must learn to see the process through the foundry’s eyes. Each step—mold making, wax chasing, shell creation, pouring, welding, metal chasing, and patination—requires a different specialist and a significant amount of time. For a small but complex piece, the labor can easily run into dozens of hours. As a benchmark, even for a desktop-size sculpture (approximately 10x8x8 inches), total foundry costs typically run $1,500 to $3,000.
The key to managing this is to request a detailed, itemized quote before committing. Do not accept a simple price-per-pound. A professional foundry should be able to break down the costs for you, allowing you to understand where your money is going and where potential savings could be made (for example, by doing some of the wax work yourself, if you have the skill). Use the following checklist to guide your conversation with a foundry and ensure there are no surprises.
Your Foundry Quote Checklist: Key Points to Clarify
- Mold Cost: Request itemized pricing for silicone mold material (which can vary based on complexity) and the mold-making labor itself.
- Wax Reproduction: If creating an edition, ask for the per-wax cost. This is the price for each subsequent wax positive pulled from the master mold.
- Casting & Metal: Clarify the cost of the bronze alloy, plus all labor associated with melting, creating the ceramic investment shell, and pouring.
- Finishing Labor: Get an hourly rate or a fixed price for the intensive work of welding, chasing (grinding and re-texturing welds), and sandblasting.
- Patina Application: Specify your desired patina. Complex, multi-layered patinas require more time and skill, and will be costed accordingly.
Approaching the foundry with this level of knowledge transforms the relationship from a simple client-vendor transaction to a professional collaboration, ensuring your artistic and financial goals are aligned.
Materials and Labor: How to Estimate Costs for a Monumental Work?
If the costs for a desktop sculpture are surprising, the leap to a life-size or monumental work is an entirely different order of magnitude. As a sculpture scales up, the costs do not increase linearly; they grow exponentially. This is because every aspect of the process becomes more complex, requires more material, more labor, and introduces entirely new logistical and engineering challenges.
A life-size figure isn’t just a bigger version of a small piece. It must be cast in multiple sections that are then expertly welded together. The sheer weight of the metal becomes a significant factor. But again, labor and logistics are the true drivers. A monumental piece requires more foundry space, larger crucibles, more people for the pour, and hundreds of hours of welding and metal chasing to make the seams invisible. In the current market, in the USA and Europe, a 6-foot life-size bronze statue typically costs $20,000 to $75,000 or more, depending on its complexity.
Beyond the foundry doors, a new set of costs emerges. A monumental sculpture is also an engineering project. It needs a structural engineer to design its internal armature and its foundation to withstand wind, weather, and public interaction. It needs to be transported on specialized trucks and lifted into place by a crane, a process that can require road closures and permits. The costs for engineering, transportation, crane rental, and an installation crew can easily add tens of thousands of dollars to the total budget, often matching or even exceeding the foundry costs.
Estimating the cost of a monumental work, therefore, requires a holistic view. It is a budget for art, manufacturing, engineering, and construction, all rolled into one. Neglecting any one of these components will lead to an unrealistic estimate and potential project failure.
How Much Does It Cost to Fix a Damaged Assemblage Piece?
Bronze is synonymous with permanence, but it is not indestructible. Accidents happen, and environmental factors can take their toll. Understanding the potential costs and processes for repair is crucial for any sculptor or collector. The cost to fix a damaged bronze sculpture depends entirely on the nature and severity of the damage, which generally falls into three categories: surface, structural, and chemical.
Surface damage, such as scratches, minor dings, or a worn patina, is the most straightforward and least expensive to repair. In many cases, a skilled founder or conservator can re-texture the scratched area and then carefully re-apply patina chemicals to blend the repair with the surrounding surface, followed by a fresh wax coat.
Structural damage is more serious and costly. This includes cracks, broken appendages, or separated sections. The repair involves TIG welding the pieces back together with a bronze rod that matches the original alloy. This is a highly skilled operation. The real work comes after the weld, in « chasing » the weld seam—grinding, filing, and re-texturing the metal so that the repair becomes completely invisible before the patina is matched. As the team at Western Washington University’s sculpture park notes when describing the initial assembly of multi-part castings:
Vents and sprues are removed, and all of the various sections are spot welded together to exactly reproduce the original. The artist is often present to direct this final process. Once satisfied with the positioning, final welds are made and dressed so they are invisible to the eye.
– Western Washington University Sculpture Woods, Bronze Casting Process – Assembly and Welding Stage
Chemical damage, such as the dreaded « bronze disease »—a form of active, powdery green corrosion that can eat away at the metal—is the most complex and expensive to treat. It requires specialized conservation treatment to remove the chlorides causing the corrosion and stabilize the metal, a process that can be very time-consuming and must be done by a trained conservator.
Ultimately, the repair process mirrors the creation process, requiring many of the same welding, chasing, and patination skills, which is why a seemingly small repair can still represent a significant investment of time and expertise.
Key Takeaways
- Mold choice is your first major commitment: reusable silicone is for editions, while one-off plaster « waste molds » are for unique pieces.
- The final cost of a bronze sculpture is driven by hours of skilled labor (wax chasing, welding, patina) and logistics, not just the raw metal.
- Patination is not painting; it is a controlled chemical reaction using heat and specific compounds to give the bronze its final color, character, and soul.
How to Propose and Execute a Public Installation Art Project in a UK City?
Placing a sculpture in the public realm is one of the highest achievements for an artist, but it involves a transition from a private creative act to a public responsibility. While the specifics can vary, the process of proposing and executing a public art project in a jurisdiction like a UK city provides a gold standard for the level of rigor required. Success depends less on the artistic merit alone and more on a comprehensive, professional proposal that addresses public safety, long-term durability, and community engagement.
A commissioning body—be it a city council, a corporate client, or a community group—is not just buying a piece of art; they are taking on a long-term liability. Your proposal must anticipate and answer all their potential concerns. This includes detailed engineering specifications for the foundation and internal structure, certified to withstand local wind loads and environmental conditions. It requires a comprehensive budget that goes far beyond the foundry bill to include insurance, transport, installation, and, crucially, a funded plan for ongoing maintenance.
The costs associated with installation alone can be substantial. Beyond the sculpture itself, a public art budget must account for many additional factors. As a general guide, public installation projects require substantial costs beyond the sculpture itself, including $800 to $2,000 for shipping, $300-$600 for crating, and $1,000-$5,000 per year for liability insurance. This doesn’t even include crane rental or site preparation fees. A successful proposal will have line items for every one of these components, with a healthy contingency added.
Blueprint for a Public Art Proposal
- Visual Documentation: Provide professional maquettes, 3D digital renderings, and scaled physical models showing the work in its proposed context.
- Comprehensive Budget: Include all costs with a 15% contingency: materials, fabrication, installation, insurance, and a fund for ongoing maintenance.
- Engineering Certification: Attach a structural engineering feasibility statement addressing wind load, seismic considerations, and foundation requirements for public safety.
- Community Engagement Plan: Detail your strategy for public consultation, meetings with local stakeholders, and accessibility considerations.
- Maintenance Schedule: Outline annual cleaning protocols, patina preservation methods, and projected long-term conservation costs.
Armed with this level of detailed planning, your proposal demonstrates not just artistic vision but also the professional competence required to earn the public’s trust and bring your monumental work to life.