In summary:
- Mastering wood engraving relies on understanding material science: wood density dictates line fineness.
- Precise control comes from moving the block on a sandbag, not just the tool.
- Inking is a science of surface tension; a hard roller is essential to avoid filling in details.
- An original print is defined by the artist’s direct creation of a physical matrix (the block).
- The art world’s strict rules for numbering prints (A/P, BAT, etc.) ensure transparency and value.
The allure of wood engraving for an illustrator is the promise of the infinitely small—the ability to render worlds of breathtaking detail within a few square inches. While many artists are familiar with relief printing through linocuts or woodcuts, they often hit a wall when seeking the microscopic precision seen in historical book illustrations. They possess the artistic vision but find the technical path elusive, blocked by a medium that seems unforgiving.
The common advice—to simply get a block and a tool—belies the deep craft at the heart of this historic technique. The crucial difference lies not just in a steady hand, but in a profound, almost scientific understanding of the materials. The true secret to mastering wood engraving is to see it as a dialogue with the material’s limits. It’s about knowing why the near-metallic density of boxwood is non-negotiable, how the physics of surface tension dictates the inking process, and why the geometry of the tool is a language in itself.
This is where illustration transcends mere reproduction and becomes fine art. But this journey also involves understanding its place in the art world, from the historical struggle for recognition to the contemporary rules that define an « original » print. This guide deconstructs the entire process, moving from the foundational science of the craft to the established conventions of the art market.
This article provides a detailed roadmap, exploring the critical choices and techniques that separate a novice attempt from a masterfully executed print. The following sections break down each essential component of the process.
Summary: A Deep Dive into the Craft of Wood Engraving
- Boxwood or Lemonwood: Why Is Density Key for Fine Lines?
- Grip and Control: How to steer the Tool without Slipping?
- Roller Hardness: How to Ink the Surface without Filling the Lines?
- Spoon or Press: Can You Print Wood Engravings at Home?
- The Error of Cutting Too Deep: Is It Possible to Plug the Wood?
- The Mistake of Looking Down on Illustrators in the Art World
- Reproduction vs Original: Why Is a Giclée of a Painting Not an Original Print?
- Artist Proof vs Limited Edition: What Are the Rules of Numbering Prints?
Boxwood or Lemonwood: Why Is Density Key for Fine Lines?
The foundation of any wood engraving is the block itself, and the choice of wood is the single most important decision an engraver makes. Unlike woodcuts, which are carved on the plank side of the wood, wood engraving is exclusively performed on the end-grain. This cross-section of the wood presents its fibers vertically, like a bundle of straws. This structure is what allows for the creation of incredibly fine and non-directional lines, as the tool, or burin, parts the fibers rather than cutting across them.
However, not just any end-grain will do. The technique demands a wood of exceptional hardness and density, with an almost invisible grain structure. This is why boxwood (Buxus sempervirens) has been the preferred material for centuries. Its extraordinary density, which can range from 1,100 to 1,200 kg/m³, is far greater than that of common hardwoods like oak or maple. This tightly packed structure provides the necessary support for the burin, preventing the walls of the incised lines from crumbling.
As the experts at Letterpress Commons note, « The dense material of the finest boxwood engraving blocks will support the cutting of almost hair-thin line work. » An excellent, though slightly less dense, alternative is Lemonwood (Calycophyllum candidissimum). The principle remains the same: the higher the density, the finer the detail the block can hold. Attempting to engrave on softer, more porous woods results in broken lines and a loss of definition, as the material simply cannot withstand the pressure of the tool and the press.
Grip and Control: How to steer the Tool without Slipping?
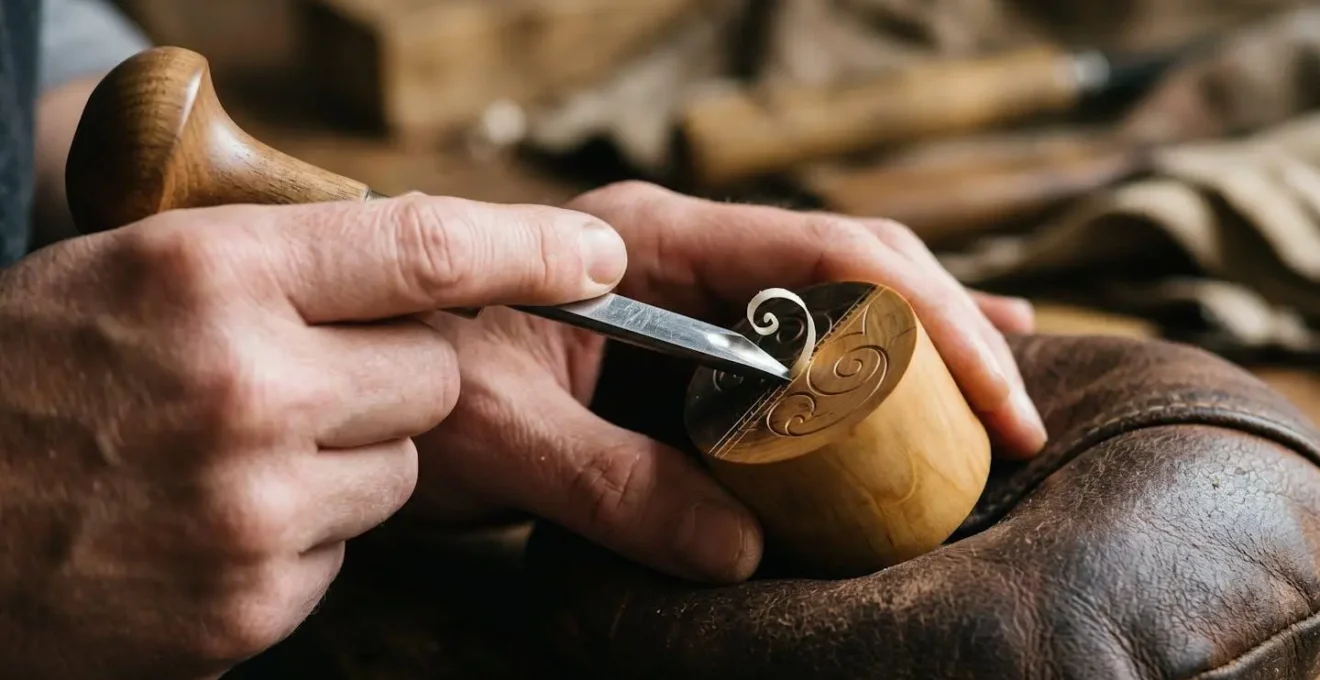
Once the correct block is chosen, the next challenge is mastering the physical act of carving. A common misconception for beginners is that control comes from moving the tool, much like drawing with a pen. In wood engraving, this approach often leads to slips and deep, unintentional gouges. The key to fluid, controlled lines—especially curves—lies in a counter-intuitive technique: the engraver keeps the tool hand relatively steady, pushing forward with controlled pressure, while the other hand rotates the block itself.
This is where a fundamental piece of equipment comes into play: the engraver’s sandbag. This is a circular leather cushion filled with sand, which provides a stable yet pivotable base for the woodblock. By resting the block on the sandbag, the artist can smoothly turn it with their non-dominant hand to create sweeping curves and precise circles, all while the burin remains on a consistent axis. This method transforms the engraving process from a wrist-and-finger action to a more controlled, two-handed dance between the tool and the material.
This image perfectly illustrates the relationship between the hands, the block, and the sandbag, showing how rotation is key to control.
As noted in encyclopedic entries on the subject, « The block is manipulated on a sandbag… This helps the engraver produce curved or undulating lines with minimal manipulation of the cutting tool. » This mastery of block manipulation, rather than just tool handling, is a significant milestone for any illustrator venturing into this medium. It turns a potentially jerky process into one of grace and precision, allowing the artist to steer the line without fear of slipping.
Roller Hardness: How to Ink the Surface without Filling the Lines?
After hours of meticulous carving, the moment of truth arrives with inking the block. This is a stage where a masterpiece can be instantly ruined. The goal is to apply a thin, even layer of stiff, oil-based ink only to the raised surface of the block, leaving the incised lines perfectly clean to appear as white on the final print. If the ink is too loose or the roller too soft, the ink will slump into the fine details, filling them in and creating a muddy, illegible image. This is a problem of surface tension and material hardness.
The solution lies in using a very hard roller, known as a brayer. The hardness of these rollers is measured on a technical scale, most commonly the Durometer Shore A scale. For relief printing, especially the fine lines of wood engraving, a brayer with a high durometer reading (typically 60 Shore A or harder) is essential. A soft roller, like one used for lithography or monoprinting, has too much « give. » It will deform under pressure, and its surface will dip into the engraved lines, depositing ink where it’s not wanted.
A hard brayer, by contrast, acts as a rigid cylinder. It bridges over the incised valleys, transferring ink only to the plateaus of the block’s surface. This ensures that every delicate line remains open and free of ink, ready to create a crisp white mark on the paper. As the technical guides from industry leaders like the American Roller Company explain, the Shore A scale is the standard for most rubber and urethane coverings in the industry. Understanding this technical specification is not just for engineers; for the wood engraver, it is crucial knowledge for achieving a clean, detailed print.
Spoon or Press: Can You Print Wood Engravings at Home?
One of the most appealing aspects of relief printing is its accessibility. Unlike intaglio processes that require a high-pressure press, a beautiful wood engraving can be printed with minimal equipment. This makes it an ideal medium for illustrators working from a home studio. The two primary methods for hand-printing are using the back of a spoon or, more traditionally, a tool called a baren. Both tools work by applying pressure to the back of the paper laid over the inked block, transferring the image.
While a sturdy wooden spoon can work for small prints, a baren is specifically designed for the task. A traditional Japanese baren is made of a coiled cord covered in bamboo leaves, while modern versions come in wood, glass, or plastic. A comparative study of printing tools highlights that a quality baren provides more consistent and controlled pressure distribution than a spoon, leading to more even ink transfer and less hand fatigue. The baren’s flat, wide surface allows the printmaker to apply smooth, circular rubbing motions that ensure every part of the image is transferred effectively.
The choice of paper is also critical when printing by hand. The pressure exerted by a baren is significantly less than that of a mechanical press. Therefore, lightweight papers are ideal. As Ritualis Press advises, « smoother lightweight papers are best for hand printing… the ideal sizes are 60-120gsm. » Thin but strong papers, particularly Japanese washi, are excellent choices as they are durable enough to withstand the rubbing but pliable enough to pick up the finest details from the block with only modest pressure.
The Error of Cutting Too Deep: Is It Possible to Plug the Wood?
The revered engraver Chris Daunt offers a stark piece of advice: « Engraving on wood is an unforgiving medium and mistakes can not usually be rectified, so ‘think twice, engrave once’. » This speaks to the immense precision and forethought required. A slip of the burin or a line cut too deeply can feel catastrophic. Unlike a drawing that can be erased, a mark carved into wood is permanent. Or is it?
While major errors are difficult to correct, small mistakes can sometimes be mitigated. If a line is too shallow, it can be re-entered and deepened. If a line is only slightly too wide or deep, it is sometimes possible to « heal » the wood. Using a polished steel tool called a burnisher, the engraver can firmly rub the area around the mistake. This action compresses the wood fibers, effectively squeezing them back into the cut and making it shallower or narrower. This technique only works for minor imperfections and requires great care not to damage the surrounding surface.
The image below captures this delicate act of repair, where the burnisher acts not as a cutting tool, but as a healing instrument.
For more significant errors, the only traditional solution is far more drastic: drilling out the flawed area and hammering in a tight-fitting plug of the same wood. The plug is then leveled and polished, providing a fresh surface to re-engrave. This is a highly skilled repair that is often more difficult than the original engraving itself. This unforgiving nature is precisely why the discipline demands such focus. It teaches the illustrator to value every mark and to cultivate a deep connection between thought and action, as Chris Daunt so wisely puts it.
The Mistake of Looking Down on Illustrators in the Art World
There has been a long and unfortunate history in the art world of a hierarchical divide between « fine art » (painting, sculpture) and « commercial art » (illustration). Illustration, being often in service of a text or a product, was seen by some as a lesser, derivative craft. Wood engraving, however, stands as one of the most powerful counterarguments to this prejudice. Its history is inextricably linked with the elevation of illustration to a high art form.
Thomas Bewick’s Revolution in Wood Engraving
The pivotal figure in this story is Thomas Bewick. Working in late 18th-century Britain, Bewick took the rustic, coarse medium of the woodcut and transformed it. By using dense, end-grain hardwood and the fine burins of the metal engraver, he unlocked a new potential for detail and tonal nuance. His engravings for natural history books were not mere decorations; they were masterworks of scientific observation and artistic expression. Bewick’s work demonstrated that an image created for a book could possess all the artistry, skill, and conceptual depth of a painting, proving that illustration and fine art craft were inseparable.
Bewick’s influence was profound. By the mid-19th century, the technique he perfected was so refined that « many wood engravings rivaled copperplate engravings » in their detail and sophistication. Artists like Edward Calvert and, later, the Pre-Raphaelites used the medium to create powerful, standalone works of art that were celebrated in their own right. They proved that the distinction between illustrator and artist is often arbitrary. A master wood engraver is both: an artist who chooses the printed page as their gallery and the book as their frame, using their craft to bring stories and ideas to life with unparalleled precision.
Reproduction vs Original: Why Is a Giclée of a Painting Not an Original Print?
In the age of digital reproduction, the term « print » has become ambiguous. An illustrator might sell « prints » of their digital work, which are typically high-quality inkjet (or Giclée) reproductions. In the world of traditional printmaking, however, the term « original print » has a very specific and protected meaning. A Giclée of a painting is a reproduction; a wood engraving is an original work of art. The key difference lies in the concept of the matrix.
An original print is an image that is conceived and created by the artist through the printmaking medium itself. The artist does not create a painting and then photograph it; they directly carve a block, etch a plate, or draw on a stone. This physical object they create—the block, plate, or stone—is the matrix. The final print is pulled directly from this artist-created matrix. As printmaker Duncan Montgomery clarifies, « Wood engraving is a relief printmaking technique where an image is carved into an endgrain block of hardwood. » The artwork *is* the carved block, and the print is its direct, hand-pulled impression. A Giclée, in contrast, has no matrix; it is a photomechanical copy of a pre-existing artwork in another medium.
This distinction is not mere semantic pedantry; it is the philosophical core of what makes printmaking a unique art form. The final image is imbued with the physical characteristics of its creation—the crisp relief of the wood, the embossed bite of an etching press, the granular texture of a lithograph. To be considered an original print, the work must pass a series of tests related to the integrity of its matrix.
Checklist for Identifying an Original Print:
- Verify the existence of a physical matrix (block, plate, or stone) created by the artist’s hand.
- Confirm the image was conceived specifically for the printmaking medium, not transferred from another artwork.
- Check that the print was pulled directly from the artist-created matrix, not photographically reproduced.
- Examine whether the medium’s unique qualities (line quality, texture, relief) are integral to the work’s concept.
- Ensure each impression shows evidence of hand-printing or press contact with the matrix.
Key Takeaways
- The integrity of a print edition is paramount; strict numbering conventions (e.g., A/P, BAT) are not suggestions but essential rules.
- Thomas Bewick proved that illustration is not a « lesser » art but can be a form of high craft through the mastery of wood engraving.
- An original print is defined by the artist’s hand creating a physical matrix; a Giclée is a reproduction, not an original print.
Artist Proof vs Limited Edition: What Are the Rules of Numbering Prints?
Once an artist has pulled a series of original prints from their matrix, they enter the final, crucial stage of the process: editioning. Editioning is the act of numbering, titling, and signing each print, and it is governed by a strict set of internationally recognized conventions. This system provides transparency for collectors and ensures the value of the limited edition. The main body of prints for sale is the numbered edition, written as a fraction, such as « 7/50, » meaning it is the seventh print in a total edition of 50.
However, several other proofs exist outside of this main edition, each with its own designation and purpose. These are not simply extra copies; they play specific roles in the printmaking process. For example, the « Bon à Tirer » (BAT) or « Right to Print » proof is the single print that the artist designates as the standard of quality against which all other prints in the edition will be judged. « Artist’s Proofs » (A/P) are a small number of additional prints, traditionally 10-15% of the edition size, which are retained by the artist for their personal archive or for gifts.
Understanding these different designations is essential for any artist or collector navigating the print market. The following table breaks down the most common types of proofs and their meanings, providing a clear guide to this essential terminology. As shown by a guide from a leading art supplier, these conventions are a cornerstone of professional practice.
| Proof Type | Designation | Purpose | Typical Quantity |
|---|---|---|---|
| Artist Proof | A/P or AP | Reserved for artist’s personal use, gifts, or archive | 10-15% of edition |
| Trial Proof | TP | Working proofs during creation process, showing developmental states | Variable |
| Bon à Tirer | BAT | Master print that defines quality standard for the edition | 1 print |
| Hors de Commerce | HC | Not for commercial sale; for exhibition or institutional purposes | Variable |
| Printer’s Proof | PP | Reserved for master printer in collaborative printmaking | 1-3 prints |
| Edition Print | 1/50, 2/50, etc. | Numbered prints in the main limited edition for sale | As declared |
Although a historical technique, wood engraving is « still prized in the early 21st century as a high-quality specialist technique, » and adhering to these professional standards is part of what maintains its prestige. For the illustrator, mastering these rules is the final step in transitioning from creating images to producing fine art objects.
Now that you understand the entire journey of a wood engraving—from the choice of block to the final signature—the next logical step is to begin your own dialogue with the wood. Acquire your first block of boxwood and a sharp burin, and start making your marks.