The greatest mistake in stone carving is believing your job is to impose a perfect idea onto a block; the reality is your role is to engage in a physical dialogue with the material.
- Success comes not from rigid planning, but from listening to the stone’s response—its sound, resistance, and grain.
- Your tools are not for brute force, but for asking questions. A sharp chisel allows for a controlled conversation; a dull one silences the stone’s feedback.
Recommendation: Approach every block not with a finished blueprint, but with an open-ended question, and let the form emerge from the conversation between your hands and the stone.
You stand before a block of stone. It’s a solid, silent mass of geological time, heavy with potential. The modern temptation is to digitize a model, load it into a CNC machine, and let a robotic arm execute a perfect, soulless copy. The pointing machine promises precision, the flawless transfer of a three-dimensional idea onto the material. It’s a shortcut, an efficient path from concept to object. But it misses the entire point.
Direct carving is not about shortcuts. It’s a conversation. The common advice often circles around finding the softest stone or meticulously plotting every cut. But this approach still treats the stone as a passive recipient of your will. It overlooks the fundamental truth that the stone has its own voice, its own history written in its grain, its hidden fissures, and its unique density. The real work of a carver is not to command, but to listen.
What if the true path to form wasn’t in forcing a preconceived idea, but in learning the stone’s language? This guide rejects the notion of sterile execution. It’s built on the philosophy of a physical dialogue, where each tap of the mallet is a question and the stone’s response—a clean break, a stubborn resistance, a change in sound—guides your next move. It is an act of discovery, not dictation.
We will explore how this conversation begins, from choosing a stone that « talks back » to keeping your tools sharp enough to hear its whispers. We will learn to see the form not as a ghost trapped inside, but as a potential revealed through a respectful exchange of force and feedback. This is the way of the direct carver.
To fully grasp this method, we will break down the essential elements of this material dialogue. The following sections guide you through the practical and philosophical steps of direct carving, from the initial choice of material to the final, expressive finish.
Summary: The Carver’s Dialogue: A Guide to Approaching the Block
- Marble or Limestone: Which Stone Is Best for Beginners?
- Chisel and Mallet: How to Keep Your Edge Sharp for Clean Cuts?
- Thinking Inside the Block: How to Visualize Negative Space?
- Sandpaper to Diamond Pads: How to Achieve a Glassy Finish on Stone?
- Silica Dust: The Mistake of Carving Without a Proper Mask
- Wind and Rain: The Mistake of Using Indoor Materials Outside in Britain
- The Mistake of Using CNC Machines to Fake Hand-Carving
- Why Is « Slow Art » Making a Comeback Against Fast Digital Production?
Marble or Limestone: Which Stone Is Best for Beginners?
The first question in your dialogue with stone is not « what is softest? » but « what will teach me the most? » For a beginner, the best material isn’t necessarily the one that yields with the least effort, but the one that provides the clearest feedback. This is where limestone excels as a mentor. With a moderate hardness, it offers enough resistance to feel substantial, but its uniform composition ensures it breaks in predictable ways. It gives clear, « gritty » auditory and tactile feedback, allowing you to learn how the material responds to the force of your chisel.
Working with an expensive, veined block of marble can be paralyzing for a novice. Every cut feels final, and the fear of a costly mistake can choke creativity. Limestone’s lower cost and forgiving nature liberate you to make bold, decisive moves. It encourages you to learn by doing, to ask questions with your tools without the weight of financial consequence. Marble has a « sugary » or glassy feel and can shatter unexpectedly along hidden veins, demanding an experienced hand that can already read these subtle signs. Limestone is a more patient teacher.
To choose your first partner in this dialogue, consider not just the difficulty, but the quality of the conversation it offers. The following comparison, based on insights from stone craft specialists, highlights these differences.
| Property | Limestone | Marble |
|---|---|---|
| Mohs Hardness | 3 | 3-5 |
| Carving Difficulty | Easy to moderate | Moderate to challenging |
| Cost Factor | Lower (reduces fear of mistakes) | Higher (can cause hesitation) |
| Composition | Uniform, predictable breaking | Variable, can shatter unexpectedly |
| Sensory Feedback | Gritty, crunchy sound | Sugary or glassy feel |
| Detail Capability | Holds small details well | Extremely fine detail possible |
| Beginner Forgiveness | High – clearer feedback | Lower – requires experience |
Ultimately, choosing limestone is choosing to prioritize learning over a prestigious material. You are selecting a partner that will speak to you clearly and help you build the foundational skills of listening to the stone.
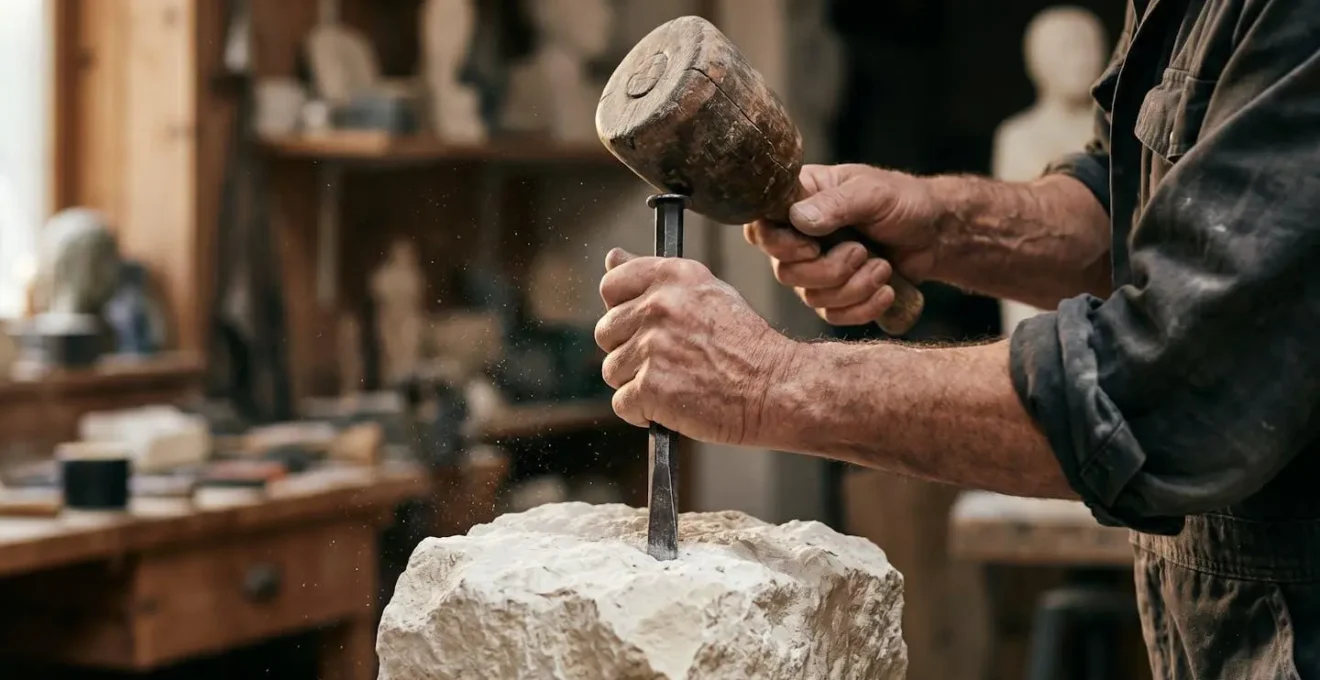
Chisel and Mallet: How to Keep Your Edge Sharp for Clean Cuts?
Your tools are your voice in the conversation with stone. A sharp chisel doesn’t just cut cleaner; it communicates your intent with precision and allows you to feel the stone’s response with sensitivity. A dull edge, by contrast, is a blunt instrument. It crushes rather than cuts, requiring more force, causing fatigue, and muddying the vital sensory feedback traveling from the stone, up the tool, and into your hands. Maintaining a sharp edge is not a chore; it is an act of respect for the dialogue.
The difference is felt in every strike. A sharp blade bites into the material with a crisp sound, removing material exactly where you intend. A dull one skids, creating dust and noise while demanding brutal, exhausting force. This loss of control is the enemy of direct carving, which relies on subtlety and response. As experts in construction trades know well, this principle is universal. According to the Journal of Light Construction, a dull chisel requires more force, leading to rapid fatigue and a loss of the subtle control that is paramount. This is as true for wood as it is for stone.
Action Plan: The Sharp Edge Ritual
- Lubricate the Stone: Before you begin, apply water or honing oil to your sharpening stone. This prevents the chisel’s steel from overheating and stops stone dust from clogging the abrasive surface.
- Find Your Angle: Hold the chisel at a consistent 20-degree angle for general carving. For aggressive roughing-out, you can increase this to 30 degrees for a more robust edge, but for detail, a lower angle is key.
- Work to the Burr: Slide the cutting edge along the length of the sharpening stone, applying even pressure. Work both sides until you can feel a « burr »—a tiny, tactile ridge of metal along the edge. This is the sign that your bevels have met.
- Hone the Burr Away: Use a slip stone or a finer-grit stone at a 45-degree angle to gently stroke away the burr from both sides of the blade. The goal here is refinement, not removal of more metal.
- Final Polish: For a surgically sharp edge capable of the finest details, finish by stropping the blade on a piece of leather. This removes the last microscopic imperfections and aligns the edge perfectly.
Think of sharpening not as a delay in your work, but as an integral part of it. Frequent, short sharpening sessions are far more effective than waiting until your tools are completely blunt. It conserves your energy and ensures the conversation with the stone remains clear and controlled.
Thinking Inside the Block: How to Visualize Negative Space?
The common advice to « visualize the form inside the block » is perhaps the most misunderstood concept in sculpture. It suggests a static, ghost-like image that you must mechanically excavate. This is the mindset of a pointing machine, not a direct carver. True visualization is not about seeing a finished product, but about establishing a dynamic relationship with the mass and the void. It’s about learning to see what is « not the sculpture » and removing it, piece by piece.
A more practical approach is the Silhouette Method. Instead of trying to hold a complex 3D form in your mind, you draw the primary profile of your intended shape onto two perpendicular sides of the block. These lines are not a rigid cage but your first reference points, transforming an abstract idea into a tangible starting point for the conversation. From here, the dialogue begins.
As you can see, these lines provide a map for your initial large cuts. Once this rough mass is removed, a more intuitive process takes over. Treat each cut as a « question » posed to the stone. The revealed surface—with its unexpected veins, color shifts, or texture changes—is the stone’s « response. » You then react to this new information, adjusting your plan. This call-and-response approach allows the final form to emerge as a collaboration between your intention and the stone’s inherent character.
Don’t try to see the whole sculpture at once. Adopt the Lighthouse Analogy: move methodically around the form, focusing only on the small area your chisel is currently illuminating. In that small patch, remove what is clearly not part of the emerging form. This piecemeal approach prevents you from becoming overwhelmed and allows for a more focused, responsive carving process.
Before any major cut, always check the stone’s grain or « bed lines. » Just like a book, stone splits more easily along these lines. Working with the grain is a respectful part of the dialogue; fighting against it is a recipe for frustration and unexpected fractures.
Sandpaper to Diamond Pads: How to Achieve a Glassy Finish on Stone?
Finishing is the final stage of the dialogue, where you transition from the assertive language of the chisel to the patient whisper of abrasion. It is not merely about making the surface shiny; it is about revealing the stone’s inner light and texture. The level of polish achievable is dictated by the stone itself. Its internal structure determines whether it will yield a mirror-like sheen or retain a soft, matte texture. Your job is to listen to this final property and work with it, not against it.
A dense, crystalline stone like marble or granite has a tightly packed structure that allows it to be polished to a glassy, reflective finish. Light penetrates the surface slightly and bounces back, creating depth and luminosity. In contrast, a more porous stone like limestone or sandstone has a granular structure that diffuses light. It can be smoothed to a beautiful honed finish, but it will never achieve a mirror polish. Forcing it to do so is a futile argument with the material’s nature.
The process is a gradual one, moving sequentially through progressively finer grits of sandpaper or diamond pads. You begin with a coarse grit (around 80 or 120) to remove the last of the chisel and rasp marks. Each subsequent, finer grit erases the scratches of the previous one. You must be methodical, ensuring you have completely removed the marks from the last stage before moving on. Skipping a grit will leave deep scratches that are impossible to polish out later. Using water during this process (wet sanding) keeps dust down and helps the abrasive cut more effectively.
The final stages, with grits running into the thousands (e.g., 1500, 3000), are where the true character of the stone is revealed. This is not mechanical work; it is a slow, meditative process of revealing what the stone has held within it all along. The final polish is the culmination of your entire conversation.
Remember that the finish is an artistic choice. A highly polished surface can feel cold and industrial, while a textured or honed finish might retain more of the raw, expressive character of the hand-carving process. The « best » finish is the one that best serves the form you have discovered together with the stone.
Silica Dust: The Mistake of Carving Without a Proper Mask
While the dialogue with stone is one of creativity and discovery, it carries a silent, deadly risk. Many stones, including granite, sandstone, slate, and even soapstone (talc), contain crystalline silica. When you carve, cut, or grind these materials, you release fine particles of silica dust into the air. This dust is too small to be seen, has no odor, and can hang in the air for hours. Inhaling it is the single greatest mistake a stone carver can make.
This is not a theoretical danger. The fine dust particles travel deep into the lungs, where they cause scarring and inflammation. Over time, this leads to silicosis, an incurable and progressive lung disease that reduces the lungs’ ability to take in oxygen. The symptoms may not appear for years, but the damage is irreversible. The health risks are severe and well-documented. For instance, a 2023 occupational health study of 79 stone carvers found that mean exposure to crystalline silica was significantly higher than occupational standards, with devastating mortality rates from silicosis and lung cancer.
Protecting yourself is non-negotiable. A simple paper dust mask is dangerously inadequate. You need a quality respirator with P100 (or N95 at a minimum) rated filters designed to capture fine particulates. Your studio hygiene must be a top priority.
- Wet-Carving: Using water during carving, grinding, and polishing is a primary method to keep dust from becoming airborne. A constant trickle of water can dramatically reduce your exposure.
- Ventilation: Your workspace needs a dedicated air filtration system or at least a strategic fan placement that creates a cross-breeze, pulling dust away from your breathing zone and exhausting it outside.
- Eye and Ear Protection: Always wear safety glasses. A flying stone chip can be as sharp as glass. When using pneumatic tools or saws, wear ear protection to prevent permanent hearing damage from sustained noise.
Treat silica dust with the same respect you give a razor-sharp tool. It is an invisible threat that must be actively managed. The conversation with stone should enrich your life, not shorten it.
Wind and Rain: The Mistake of Using Indoor Materials Outside in Britain
The dialogue with stone does not end when you put down your tools. If a sculpture is destined for the outdoors, the conversation is simply handed over to a new set of partners: wind, rain, ice, and sun. Choosing a material that cannot withstand this continuous, elemental dialogue is a critical error, particularly in relentlessly wet and variable climates like that of Britain.
Porous stones like certain types of limestone and sandstone are like sponges. They absorb water, and in a climate with frequent freeze-thaw cycles, this trapped moisture is destructive. As the water freezes, it expands, exerting immense internal pressure that leads to cracking, spalling (flaking), and eventual disintegration. Acid rain further accelerates this decay, slowly dissolving the stone’s surface and erasing fine details. As documented by UK fine art restoration specialists, stone sculptures in the region are highly susceptible to this internal destruction from trapped moisture.
The choice of stone for outdoor work must be a strategic one, prioritizing durability over ease of carving. Dense, non-porous stones are the most resilient. Granite and basalt are excellent choices, offering extreme resistance to moisture and temperature fluctuations. While marble is a classic sculptural material, it is surprisingly susceptible to acid rain and may require protective sealants to survive long-term outdoors. The durability of a stone for outdoor use depends almost entirely on its ability to resist water penetration.
Even with a durable stone, certain design considerations can prolong a sculpture’s life. Avoid creating forms that collect water, and ensure the piece has adequate drainage. A protective sealer can be applied, but this creates its own maintenance cycle, as it will need to be reapplied periodically.
Ultimately, placing a sculpture outside is an act of trust. You are trusting the material you chose to be strong enough to continue its conversation with the elements long after you are gone, allowing it to age and develop a patina that tells a new story over time.
Key Takeaways
- Direct carving is a dialogue: Your goal is to listen and respond to the stone, not just impose your will upon it.
- A sharp tool enables control and sensitivity; a dull tool relies on brute force and obscures the stone’s feedback.
- The authenticity of hand-carving lies in the « living rhythm » of tool marks, a story that machines cannot replicate.
The Mistake of Using CNC Machines to Fake Hand-Carving
In an age of digital replication, the temptation to use a CNC machine to rough out a form and then add a few superficial « hand-carved » textures at the end is strong. This is presented as a hybrid approach, but it is a fundamental misunderstanding of what makes hand-carved work valuable. The soul of a hand-carved piece is not in its final texture, but in the complete, continuous dialogue between the sculptor and the stone from start to finish. A CNC machine cannot have this dialogue; it can only execute a program.
The marks left by a machine are sterile and mathematically uniform. They lack the « living rhythm » of a human hand responding to the stone’s grain and density. A true hand-carved surface tells a story. You can see the subtle inconsistencies, the slight undulations where the carver adjusted their force, and the unique character of each tool—the dimples of a point chisel, the parallel grooves of a claw, the smooth planes of a flat chisel. These are not imperfections; they are the authentic record of the creative process. As The Sculpture Studio notes, the wide variety of textures that can be created by hand can « really bring the stone to life » in a way that mechanical perfection cannot.
To an experienced eye, the difference is immediately obvious. Here are the visual indicators of authentic hand-work:
- Minute Variations: Hand-carved surfaces show subtle, non-repeating inconsistencies in the depth and width of tool marks.
- Organic Rhythm: The patterns of chisel strokes follow a natural flow, responding to the sculptor’s movement and the stone’s structure.
- Tool Signatures: Different parts of the sculpture will show the distinct marks of the specific tools used to create those forms.
- Fluid Transitions: The shift from a rough-textured area to a smooth one is gradual and organic, not an abrupt, geometric boundary.
While using a machine for the initial, brutal roughing-out of a massive, multi-ton block may be a pragmatic necessity, the artistic integrity is only maintained if 100% of the form-defining work, the textural decisions, and the final finishing are executed by hand. The story must be written by a human hand, not a computer program.
Why Is « Slow Art » Making a Comeback Against Fast Digital Production?
The resurgence of interest in traditional, hands-on practices like direct stone carving is more than a trend; it’s a deeply human response to an increasingly digital and dematerialized world. « Slow Art » stands in direct opposition to the instant gratification of fast digital production. It champions the value of process, the beauty of imperfection, and the profound connection between a maker and their material. It is a philosophy rooted in the physical, the tactile, and the time-honored dialogue between hand, tool, and substance.
Fast production, whether through a 3D printer or a CNC mill, prioritizes the final object. The path to get there is about efficiency and flawless replication. Slow Art, however, argues that the journey is as important—if not more so—than the destination. The hours spent listening to the stone, the rhythm of the mallet, the gradual emergence of form, the story told by every tool mark—these are what imbue the final piece with its soul and authenticity. It is an art form that requires patience, mindfulness, and a physical presence that digital tools cannot replicate.
This movement is a search for meaning beyond the pixel. It’s a recognition that an object made slowly, by hand, carries the energy and intention of its creator. The subtle variations and « mistakes » are not flaws but evidence of a human touch, a record of a unique moment in time. As one sculptor shared in a testimonial on The Sculpture Studio’s resources, the experience can be transformative: « With some experience and the proper tools, I find that I can now work the softer stones as easily as wood – stone opened up a whole range of new sculptural possibilities for me. » This discovery is the heart of the slow art experience.
Choosing direct carving over a pointing machine is not an inefficient choice; it is a philosophical one. It is a commitment to a process of discovery, a physical meditation, and the creation of an object that is not just made, but born from a genuine dialogue with the material world.
Embrace the slowness. Find the rhythm of your breath in the strike of your mallet. Let your hands learn the language of the stone, and begin the conversation that has been waiting in that silent block for millennia.