To move beyond flat line work, an etcher must learn to think in veils of tone, a skill unlocked not by a formula, but by developing a sensory dialogue with the aquatint process.
- The quality of your tonal wash is determined by the fineness and evenness of the initial rosin dust, or « granular matrix. »
- Controlling heat to melt the rosin into a transparent, porous ground—without burning it—is the most critical step for allowing the acid to bite evenly.
- True mastery comes from creating and using a personal tonal test strip to predict exactly how acid exposure time translates into darkness.
Recommendation: Stop treating aquatint as a mechanical step and start engaging with it as a painterly medium, listening to your materials to create atmosphere and depth.
For the etcher accustomed to the clean, decisive clarity of the engraved line, the world of tone can feel like a mysterious, uncontrollable fog. You’ve mastered the burin and the needle, yet your desire to evoke shadow, light, and atmosphere remains unfulfilled. The common advice— »just use aquatint »—is deceptively simple. It hints at a process but reveals nothing of its soul. Many artists attempt it, only to be met with blotchy, uneven washes or plates where the tones either vanish or collapse into a muddy black. This frustration is common, stemming from treating aquatint as a rigid, mechanical procedure rather than an expressive art form in its own right.
The transition from line to tone is not about finding a secret recipe. The real key lies in shifting your mindset from that of a draftsman to that of a painter who uses chemistry as their pigment. It requires cultivating a material intelligence—a deep, sensory understanding of how rosin dust behaves, how heat transforms it, and how acid whispers onto the plate. Aquatint is a dialogue between control and chance, and learning its language involves your eyes, your hands, and even your ears.
This guide will demystify the process by focusing on that sensory dialogue. We will explore the critical decisions at each stage, from laying the perfect grain to orchestrating the acid bite. By understanding the *why* behind each technical step, you will learn to control the granular matrix and build the ethereal, powdery washes that give intaglio prints their unique depth and soul.
To navigate this nuanced art form, we will break down the essential stages. The following summary outlines the key areas we will explore, providing a clear path from preparing the plate to achieving a masterful final print.
Summary: A Guide to Mastering Aquatint Tonal Washes
- Dust Box or Hand Shake: How to Get an Even Grain on the Plate?
- Heat Gun or Hot Plate: How to Melt Rosin without Burning It?
- Varnish and Brush: How to Paint White Areas before Etching?
- Seconds vs Minutes: How Acid Time Affects Darkness of Tone?
- The Error of Handling the Plate with Greasy Fingers
- Resist and Developer: How to Paint with Chemistry on Photo Paper?
- Reveal the History: How to Scrape Back Layers for Depth?
- How to Build Texture and Layers using Cold Wax Medium with Oils?
Dust Box or Hand Shake: How to Get an Even Grain on the Plate?
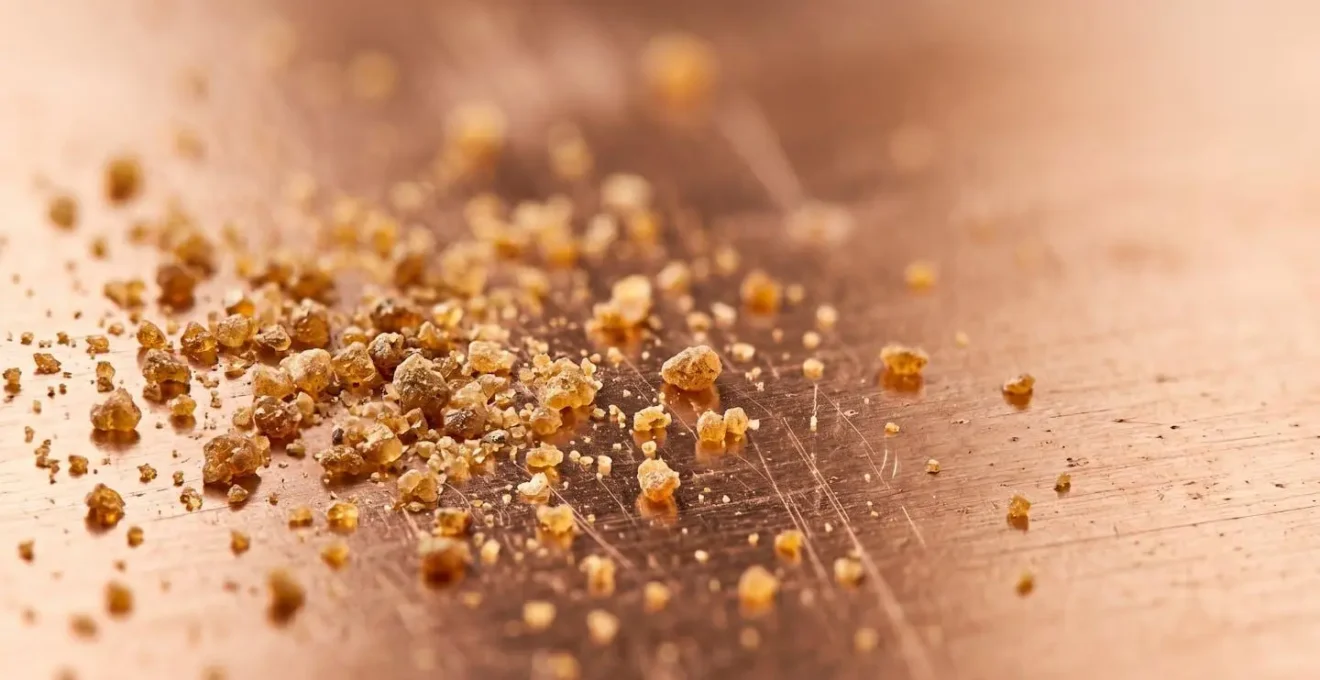
The foundation of any successful aquatint is the granular matrix of rosin dust applied to the plate. This is not just a protective layer; it is a finely perforated veil that will dictate where the acid can bite. An even, consistent grain leads to smooth, uniform tones, while an uneven grain results in blotches and unwanted textures. The goal is to achieve a consistent deposition of rosin particles across the metal. Professional printmaking standards recommend aiming for approximately 50% coverage of the plate’s surface, a balance where enough copper is exposed for the acid to act, but the particles are dense enough to create a cohesive tone.
To achieve this, two primary methods exist. The aquatint box is the tool of choice for ultimate control. By cranking a paddle or using compressed air, a cloud of rosin dust is created inside an enclosed chamber. The plate is introduced after the larger, coarser particles have settled, allowing only the finest dust to gently settle on its surface. This method produces the most uniform and finely grained grounds, ideal for photographic-quality tones. In contrast, the hand-dusting method, historically used by masters like Francisco Goya, offers a more direct and often more atmospheric result. By tapping a muslin bag filled with rosin over the plate, the artist creates a more varied grain. This controlled chance introduces a gritty, organic texture that can be highly expressive.
The key to either method is consistency and testing. A simple way to check your grain density before committing to heat is to dust a piece of black paper; the yellow rosin will be clearly visible, giving you a good approximation of the final result. Remember that until the rosin is melted, it is incredibly delicate. Handle the plate with extreme care, as the slightest touch or breath can disturb the fragile matrix you’ve so carefully laid down.
Heat Gun or Hot Plate: How to Melt Rosin without Burning It?
Applying the rosin is only half the battle; adhering it to the plate with heat is the most critical and delicate transformation in the aquatint process. This is where the artist’s sensory intelligence is paramount. The goal is to melt each tiny particle of rosin just enough for it to fuse to the copper or zinc, creating a durable, acid-resistant ground. Under-melting leaves the rosin powdery and weak, ready to flake off in the acid bath. Over-melting is equally disastrous: the individual particles liquefy, spread, and pool together, sealing the plate and preventing the acid from biting at all. This creates a glossy, non-porous surface that will print as a stark, unintended white.
Whether using a hot plate or a heat gun, the process is one of careful observation. As heat is applied, the pale, powdery rosin will first take on the appearance of « wet sand. » This is the signal that the melting point is near. The critical moment arrives when the particles turn transparent and glistening, indicating they have properly adhered. This is the precise instant to remove the heat. While technical documentation specifies that 240°F (approximately 115°C) is the ideal temperature, visual cues are far more reliable than thermometers. A hot plate offers even, consistent heat from below, but you must watch the plate’s surface constantly. A heat gun provides more localized control but risks creating hot spots if not kept in constant motion.
After the rosin has melted to that perfect transparent state, the plate must be allowed to cool completely, for roughly 15 minutes. Handling it while warm can cause severe burns and, more importantly, can damage the delicate, newly-formed rosin structure. This cooling period allows the granular matrix to harden into the resilient, porous ground necessary for a beautiful aquatint.
Varnish and Brush: How to Paint White Areas before Etching?
Once the rosin ground is fused to the plate, the artist begins to compose the image by painting not with light, but with darkness—or rather, its absence. The areas of the plate that are to remain pure white in the final print must be protected from the acid. This is achieved by painting them with an acid-resistant liquid known as stop-out varnish. This crucial step is where the artist’s hand re-enters the process in a direct, painterly way. With a fine brush, you carefully cover every section intended to be a highlight, creating a negative of your desired light areas. As printmaker Friedrich Krkala notes in his manual on non-toxic methods, this is the core of the creative act at this stage.
The image is created by painting with stop-out varnish or by any other etch resistant means such as adhesive tape, litho crayon etc.
– Friedrich Krkala, Aquatint-FK Manual, Nontoxicprint Resource
This act of stopping-out defines the brightest whites and sets the stage for the tonal development to come. However, the concept of « painting » in aquatint can be taken a step further with the advanced spit-bite technique. Here, instead of just protecting areas, the artist paints directly onto the aquatinted plate with a thickened acid solution. Traditionally thickened with saliva (hence the name), this method allows for the creation of soft, graduated tones that resemble watercolour washes. By varying the acid concentration and how long it sits on the plate, the artist can create expressive, gestural marks and subtle transitions, turning the etching process itself into a durational performance.
Both methods—stopping-out for hard-edged whites and spit-bite for soft, painted tones—transform the resist from a purely functional barrier into an essential tool for mark-making. They are the primary ways an artist translates their vision of light and shadow onto the plate before the chemical process of etching begins.
Seconds vs Minutes: How Acid Time Affects Darkness of Tone?
With the highlights protected, the plate is ready for its dialogue with the acid. This is where time becomes your medium. The darkness of an aquatint tone is directly proportional to how long the plate is submerged in the acid bath (commonly a solution of ferric chloride). The acid bites into the tiny pockets of exposed metal between the rosin particles, creating microscopic pits that will hold ink. The longer the exposure, the deeper the pits, and the darker the resulting printed tone. However, this relationship is not always linear; the first few moments in the acid create a more dramatic shift in tone than later, longer exposures.
To control this process with any degree of predictability, creating a personal tonal test strip is not just recommended—it is essential. This is your Rosetta Stone for aquatint, translating abstract units of time into a concrete scale of visible grey values. By systematically exposing a small, aquatinted plate to the acid in increasing intervals (e.g., 15 seconds, 30 seconds, 1 minute, 2 minutes, 4 minutes, and so on) and stopping-out a strip after each immersion, you create a definitive reference chart. This chart will be unique to your specific setup: your acid concentration, the temperature of your studio, and the fineness of your rosin grain.
Once you have this printed reference, you can approach your actual plate with confidence. If you want a pale, atmospheric grey, you know from your test strip that it might require a 45-second bite. For a deep, velvety black, you might need an exposure of 8 minutes or more. This systematic approach removes the guesswork and transforms what could be a frustrating game of chance into a precise and repeatable method for building complex tonal compositions.
Your Action Plan: Creating a Personal Tonal Test Strip
- Prepare a small test plate (approximately 3×5 inches) with evenly applied aquatint rosin melted to the surface.
- Begin with a 15-second acid bath exposure for the entire plate, then remove, rinse thoroughly, and dry.
- Apply stop-out varnish to a narrow strip (approximately 0.5 inch wide) to preserve the 15-second tone.
- Return the plate to acid for 30 seconds additional time (cumulative: 45 seconds), remove, rinse, and stop-out another strip.
- Continue the process with progressively doubled intervals: +1 minute (cumulative: 1 min 45 sec), +2 minutes (cumulative: 3 min 45 sec), +4 minutes (cumulative: 7 min 45 sec).
- Print the test strip to create a definitive tonal reference chart specific to your acid concentration, temperature, and rosin grain, enabling predictable tone control in future work.
The Error of Handling the Plate with Greasy Fingers
The most meticulous rosin application and perfectly timed acid bite can be completely undone by an invisible enemy: grease. The success of an aquatint depends on the absolute, chemical cleanliness of the plate’s surface. Even the slightest trace of oil from your fingertips can act as an unintentional, and highly effective, acid resist. Where grease is present, the rosin will not adhere properly, or the acid will be blocked from reaching the metal. This results in fingerprints, smudges, and other unwanted white blemishes that starkly disrupt the intended tonal wash. It’s a common and frustrating error for beginners who underestimate the sensitivity of the process.
Therefore, degreasing the plate before applying the rosin ground is a non-negotiable first step. This ensures a pristine surface that is receptive to both the rosin and the acid. While various detergents can be used, the traditional and most thorough method involves creating a paste from whiting powder (calcium carbonate) and a diluted ammonia solution. This paste is scrubbed vigorously over the entire surface of the plate with a clean rag or piece of felt. The sign of a perfectly degreased plate is that water « sheets » off the surface in a uniform film rather than beading up into droplets, which indicates remaining grease.
This rigorous cleaning is especially critical for aquatint, where you are striving for that ideal 50% surface coverage. A clean plate allows for an even, intimate bond between each rosin particle and the metal, ensuring the integrity of the granular matrix. For standard aquatint, this degreasing protocol should be performed twice; for even more sensitive techniques like sugar lift, it should be done up to four times. Once the plate is degreased and dried, you must proceed immediately with the rosin application, handling the plate only by its edges to prevent recontamination. This discipline is the foundation upon which all subsequent tonal beauty is built.
Resist and Developer: How to Paint with Chemistry on Photo Paper?
While the title mentions « photo paper, » a nod to photogravure processes, its spirit captures a profound shift in thinking for the traditional etcher: viewing your materials not as static tools, but as active chemical agents, akin to a photographer’s resist and developer. In standard etching, we think of stop-out varnish as a simple mask. But what if we saw it as a « resist » in the photographic sense—a tool for selective development? This reframing opens up a world of painterly possibilities.
The spit-bite technique, where acid is painted directly onto the plate, is the most literal expression of this idea. Here, the artist is truly « painting with chemistry. » The brush, loaded with corrosive « developer » (acid), creates tones in real-time. But this philosophy extends further. Consider using different types of resists on a single plate. A hard, crisp line from a traditional stop-out varnish can be contrasted with the soft, reticulated edge of a diluted « soft » ground. You can draw into the ground with litho crayons or other greasy materials, each of which will resist the acid in its own unique way, leaving a different textural signature.
This approach transforms the plate into a canvas for chemical reactions. You are not just carving lines or laying tones; you are orchestrating a controlled corrosion. You are anticipating how one chemical (the resist) will mediate the action of another (the etchant). By embracing this mindset, you move beyond the binary of « etched » or « not etched. » Instead, you discover a spectrum of textures, edges, and marks, all born from the dynamic interplay of your chosen materials. It’s a way of thinking that bridges the gap between the printmaker’s workshop and the painter’s studio.
Reveal the History: How to Scrape Back Layers for Depth?
The aquatint process is largely additive: you build darkness by adding time in the acid. However, the true mastery of tone involves a subtractive process as well—the art of carving light back into a darkened plate. This is where tools like the scraper and burnisher become essential. While traditionally associated with the mezzotint technique, they are powerful instruments for refining and correcting aquatinted areas, adding highlights, and revealing the « history » of the plate’s layers.
Imagine you have an area that has been over-etched, resulting in a tone that is too dark. The burnisher, a smooth, hard steel tool, can be used to polish and compress the textured surface of the plate. By rubbing it firmly over the aquatint grain, you reduce the « tooth » of the plate in that area. This lessens its ability to hold ink, effectively lightening the tone. Gentle burnishing can create subtle modulations and soft gradients within a field of black, while vigorous polishing can bring a dark grey all the way back to a light silver.
For more dramatic corrections or the creation of brilliant white highlights within a dark passage, the scraper is used first. This sharp, three-sided blade literally shaves away the top layer of the metal, removing the etched texture entirely. After scraping, the area is then polished with the burnisher to create a perfectly smooth surface that will wipe clean of ink and print as a pure, stark white. This subtractive method, working from dark to light, provides a beautiful counterpoint to the additive acid-biting process. Combining both on a single plate allows for the maximum possible tonal range, from the richest velvety blacks to the most brilliant, scraped-back whites.
Key takeaways
- The quality of an aquatint wash depends less on a formula and more on developing a sensory feel for the materials, from the fineness of the rosin dust to the shimmer of melting.
- A personal tonal test strip is the single most important tool for achieving predictable and repeatable results, translating acid exposure time into a reliable gray scale.
- Mastery involves combining additive processes (acid biting) with subtractive ones (scraping and burnishing) to achieve the full spectrum of tone from pure white to velvety black.
How to Build Texture and Layers using Cold Wax Medium with Oils?
Though the title evokes an oil painting technique, its essence—building texture and layers—is the ultimate goal of a master etcher. An aquatint print is not a single surface; it is a topography of textures built in successive stages. The final image is a synthesis of every decision made, from the initial choice of rosin grain to the final polish of a burnisher. This is how you build a print with the complexity and depth of a painting.
The first layer of texture is the rosin grain itself. A coarse, hand-dusted grain will impart a different atmospheric quality than a fine, uniform grain from a dust box. The next layer is built in the acid bath. By using your tonal test strip to orchestrate a series of « stepped bites »—etching for different lengths of time across different areas of the plate—you create a rich tapestry of grey values. This is not a flat shading but a physical layering of depth into the copper.
Finally, the subtractive layer is added. By scraping and burnishing into the darkest passages, you carve light back into the composition. This final act can define a sharp highlight on a reflective surface or create a soft, ethereal glow, adding a final layer of texture and complexity. Each of these techniques—the granular matrix, the chemical etch, the physical abrasion—leaves its own unique signature on the plate. When combined, they create a visual history, a layered surface where deep, velvety pits coexist with smooth, polished planes. This is the true art of aquatint: not just creating tone, but building a rich, tactile world on a flat metal plate.
By moving beyond mechanical steps and embracing a holistic, layered approach, you can transform your prints from simple line drawings into profound explorations of light, shadow, and atmosphere. Begin today by creating your own tonal test strip and start the sensory dialogue with your materials.